Let’s pick up right where we left off! Here’s the Overall Project Roadmap visual first, then we’ll dive into the folder structure and Task 1.
Here’s a visual overview of the full system pipeline, then the complete folder structure and Task 1.
Here is the full project roadmap visualized above — click any component to learn more about it. Now let’s go through the complete roadmap, folder structure, and Task 1 in detail.
📋 Full Project Roadmap
The project is split into 7 phases with 12 tasks total:
Phase 1 — Foundation
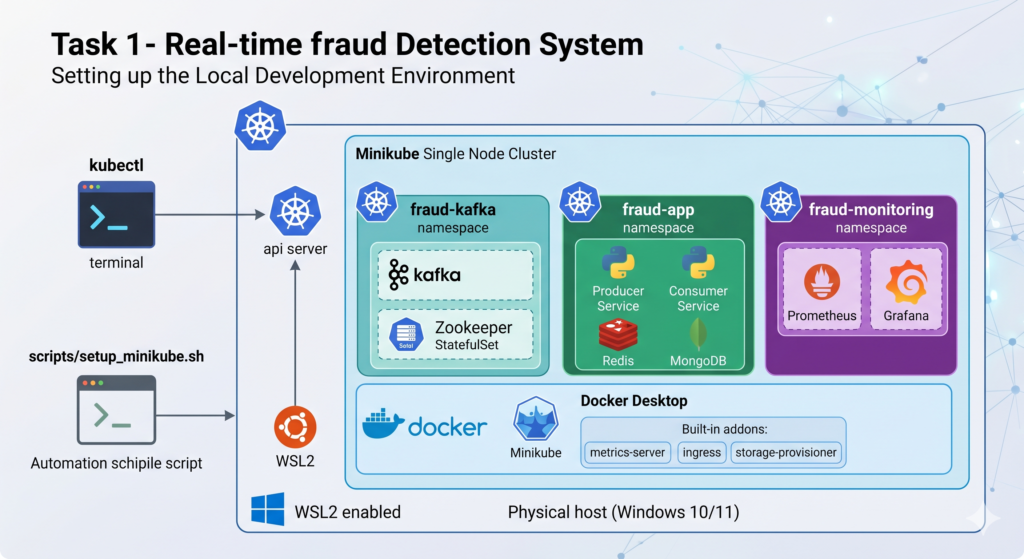
- Task 1: Local environment setup (WSL2, Docker, Minikube, namespaces) ← we start here
- Task 2: Monorepo scaffold & project structure
Phase 2 — Data & ML
- Task 3: Data exploration & feature engineering (Google Colab)
- Task 4: XGBoost model training, evaluation, and export
Phase 3 — Streaming Pipeline
- Task 5: Kafka + Zookeeper deployment in K8s
- Task 6: Data producer service (Python)
- Task 7: Consumer/inference service (Python + Redis)
Phase 4 — Storage & State
- Task 8: MongoDB StatefulSet deployment + schema design
Phase 5 — Frontend
- Task 9: Streamlit dashboard with secure login
Phase 6 — Observability
- Task 10: Prometheus + Grafana with custom business metrics
Phase 7 — CI/CD & Security
- Task 11: GitHub Actions pipeline (build + push to Docker Hub)
- Task 12: Kubernetes Secrets + manual rollout strategy
📁 Industry-Standard Monorepo Structure
This is the full folder layout you will build. Create it now — having the skeleton in place makes every future task easier.
fraud-detection-system/
│
├── .github/
│   └── workflows/
│       └── ci-cd.yml                  # GitHub Actions pipeline
│
├── infra/                             # All Kubernetes manifests
│   ├── namespaces/
│   │   └── namespaces.yaml
│   ├── secrets/
│   │   └── secrets.yaml               # K8s Secrets (never committed with real values)
│   ├── kafka/
│   │   ├── zookeeper-statefulset.yaml
│   │   ├── kafka-statefulset.yaml
│   │   └── kafka-service.yaml
│   ├── redis/
│   │   ├── redis-deployment.yaml
│   │   └── redis-service.yaml
│   ├── mongodb/
│   │   ├── mongo-statefulset.yaml
│   │   ├── mongo-service.yaml
│   │   └── mongo-pvc.yaml
│   ├── producer/
│   │   ├── producer-deployment.yaml
│   │   └── producer-service.yaml
│   ├── consumer/
│   │   ├── consumer-deployment.yaml
│   │   └── consumer-service.yaml
│   ├── streamlit/
│   │   ├── streamlit-deployment.yaml
│   │   └── streamlit-service.yaml
│   └── monitoring/
│       ├── prometheus-config.yaml
│       ├── prometheus-deployment.yaml
│       ├── grafana-deployment.yaml
│       └── grafana-service.yaml
│
├── services/                          # Application source code
│   ├── producer/
│   │   ├── Dockerfile
│   │   ├── requirements.txt
│   │   ├── main.py                    # Reads CSV, sends to Kafka
│   │   └── config.py
│   │
│   ├── consumer/
│   │   ├── Dockerfile
│   │   ├── requirements.txt
│   │   ├── main.py                    # Reads from Kafka, runs inference
│   │   ├── predictor.py               # XGBoost inference logic
│   │   └── config.py
│   │
│   └── dashboard/
│       ├── Dockerfile
│       ├── requirements.txt
│       ├── app.py                     # Streamlit main app
│       ├── auth.py                    # Login page logic
│       └── pages/
│           ├── live_feed.py
│           └── analytics.py
│
├── ml/                                # ML training (runs on Colab)
│   ├── notebooks/
│   │   └── fraud_detection_training.ipynb
│   ├── models/
│   │   └── .gitkeep                   # Model artifacts go here after training
│   └── src/
│       ├── train.py
│       ├── evaluate.py
│       └── feature_engineering.py
│
├── data/
│   └── .gitkeep                       # Raw CSV goes here (gitignored)
│
├── scripts/                           # Convenience shell scripts
│   ├── setup_minikube.sh
│   ├── apply_all_manifests.sh
│   └── port_forward.sh
│
├── docs/
│   └── architecture.md
│
├── .gitignore
├── .env.example                       # Template for local env vars (never commit .env)
└── README.md
Why a monorepo? In industry, keeping all services in one repository makes it easier to coordinate changes across services, share CI/CD pipelines, and maintain a single source of truth. Companies like Google and Meta use monorepos at massive scale.
✅ Task 1: Local Environment Setup
What we’re setting up and why
Before writing a single line of application code, your local machine needs to become a mini production environment. Here’s what each tool does:
- WSL2 — runs a real Linux kernel inside Windows, essential because Docker and K8s tooling is Linux-native
- Docker Desktop — the container runtime; everything we deploy will be a Docker image
- Minikube — a single-node Kubernetes cluster that runs on your laptop; simulates production K8s
- kubectl — the CLI to talk to any K8s cluster
- Namespaces — logical partitions inside K8s; we separate
fraud-app,monitoring, andkafkanamespaces like teams would in a real company
Step 1.1 — Verify WSL2 is properly configured
Open PowerShell as Administrator and run:
wsl --status
wsl --list --verbose
You should see your Ubuntu distro listed with VERSION 2. If it shows VERSION 1, upgrade it:
wsl --set-version Ubuntu 2
Now open your WSL2 Ubuntu terminal. All remaining commands in this project are run inside WSL2 unless stated otherwise.
# Verify you're on Ubuntu
cat /etc/os-release

# Update packages first — always do this on a fresh environment
sudo apt-get update && sudo apt-get upgrade -y

# Install essential tools
sudo apt-get install -y curl wget git unzip jq
Step 1.2 — Install kubectl
kubectl is the universal CLI for Kubernetes. Think of it as the “remote control” for your cluster.
# Download the latest stable release
curl -LO "https://dl.k8s.io/release/$(curl -L -s https://dl.k8s.io/release/stable.txt)/bin/linux/amd64/kubectl"

# Install it to your PATH
sudo install -o root -g root -m 0755 kubectl /usr/local/bin/kubectl

# Verify
kubectl version --client
Step 1.3 — Install Minikube
# Download Minikube binary
curl -LO https://storage.googleapis.com/minikube/releases/latest/minikube-linux-amd64

# Install it
sudo install minikube-linux-amd64 /usr/local/bin/minikube

# Verify
minikube version
Step 1.4 — Start Minikube with production-like resource allocation
This is important. We give Minikube enough CPU and RAM to run Kafka, Redis, MongoDB, and our services simultaneously. The docker driver tells Minikube to use Docker Desktop as the container runtime.
minikube start \
  --driver=docker \
  --cpus=4 \
  --memory=6144 \
  --disk-size=20g \
  --kubernetes-version=stable

# Verify the cluster is running
kubectl cluster-info
kubectl get nodes
You should see one node in Ready state. If you see errors about Docker not running, make sure Docker Desktop is open on Windows first.
Step 1.5 — Enable essential Minikube addons
# Metrics server — required for Prometheus to scrape pod metrics
minikube addons enable metrics-server

# Ingress — allows external access to services
minikube addons enable ingress

# Storage provisioner — required for PersistentVolumes (MongoDB will need this)
minikube addons enable default-storageclass
minikube addons enable storage-provisioner

# Verify addons
minikube addons list
Step 1.6 — Create the project namespaces
In production Kubernetes, teams use namespaces to isolate workloads. We’ll use three:
| Namespace | Purpose |
|---|---|
fraud-app | All application services (producer, consumer, dashboard) |
fraud-kafka | Kafka and Zookeeper |
fraud-monitoring | Prometheus and Grafana |
Create the file infra/namespaces/namespaces.yaml:
apiVersion: v1
kind: Namespace
metadata:
  name: fraud-app
  labels:
    project: fraud-detection
    managed-by: kubectl
---
apiVersion: v1
kind: Namespace
metadata:
  name: fraud-kafka
  labels:
    project: fraud-detection
    managed-by: kubectl
---
apiVersion: v1
kind: Namespace
metadata:
  name: fraud-monitoring
  labels:
    project: fraud-detection
    managed-by: kubectl
Apply it to the cluster:
kubectl apply -f infra/namespaces/namespaces.yaml

# Verify all three namespaces exist
kubectl get namespaces | grep fraud
Expected output:
fraud-app          Active   10s
fraud-kafka        Active   10s
fraud-monitoring   Active   10s
Step 1.7 — Create the project scaffold
Run this script from inside WSL2 to create the full folder structure in one shot:
# From your home directory or preferred workspace
mkdir -p fraud-detection-system && cd fraud-detection-system

# Create all directories
mkdir -p .github/workflows
mkdir -p infra/{namespaces,secrets,kafka,redis,mongodb,producer,consumer,streamlit,monitoring}
mkdir -p services/{producer,consumer,dashboard/pages}
mkdir -p ml/{notebooks,models,src}
mkdir -p data scripts docs

# Create placeholder files
touch ml/models/.gitkeep
touch data/.gitkeep
touch README.md docs/architecture.md

# Create .gitignore
cat > .gitignore << 'EOF'
# Environment & secrets
.env
*.env
infra/secrets/secrets-populated.yaml

# Data files
data/*.csv
data/*.parquet

# ML artifacts
ml/models/*.pkl
ml/models/*.json
ml/models/*.ubj

# Python
__pycache__/
*.pyc
*.pyo
.venv/
venv/

# Misc
.DS_Store
*.log
EOF

# Create .env.example
cat > .env.example << 'EOF'
# Kafka
KAFKA_BOOTSTRAP_SERVERS=fraud-kafka-service.fraud-kafka.svc.cluster.local:9092
KAFKA_TOPIC=transactions

# MongoDB
MONGO_URI=mongodb://admin:password@fraud-mongo-service.fraud-app.svc.cluster.local:27017

# Redis
REDIS_HOST=fraud-redis-service.fraud-app.svc.cluster.local
REDIS_PORT=6379

# Streamlit
STREAMLIT_USERNAME=admin
STREAMLIT_PASSWORD=changeme
EOF

echo "Project scaffold created successfully!"
ls -la
Step 1.8 — Verify everything is working
Run these final checks. Every line should return a clean result:
# Docker is accessible from WSL2
docker --version
docker ps

# Minikube cluster is healthy
minikube status
kubectl get nodes
kubectl get namespaces

# Your three namespaces exist
kubectl get ns fraud-app fraud-kafka fraud-monitoring
Save a convenience script for restarting everything later:
cat > scripts/setup_minikube.sh << 'EOF'
#!/bin/bash
set -e

echo "Starting Minikube..."
minikube start --driver=docker --cpus=4 --memory=6144 --disk-size=20g

echo "Enabling addons..."
minikube addons enable metrics-server
minikube addons enable ingress

echo "Applying namespaces..."
kubectl apply -f infra/namespaces/namespaces.yaml

echo "Done! Cluster is ready."
kubectl get nodes
kubectl get namespaces | grep fraud
EOF

chmod +x scripts/setup_minikube.sh
Task 1 Checkpoint ✅
Before moving on, you should be able to answer these questions (think through them — don’t look them up):
- Why do we run everything inside WSL2 instead of Windows PowerShell directly?
- What is the difference between a Docker container and a Kubernetes Pod?
- Why do we separate Kafka into its own namespace instead of putting everything in
fraud-app?
When you’re ready, reply with your answers and we’ll move on to Task 2: Creating the base Dockerfiles and requirements.txt files for each service, which gets all three Python microservices structurally ready before we write any business logic.

Questions & discussion
Stuck on a step? Ask below — I reply to every module question.

hello at 7.15
good content bro